Tuesday, October 9, 2012
Growing Sprouts for Hens and Humans
Since The Egg Project is about eggs from grass-fed, cage-free hens, I have to figure out what to do about providing grass/greens in winter when the portable laying house is stilled for the season. One answer--- sprouts.
Growing various kinds of sprouts is an interesting exercise in personal self-sufficiency that I've done before. But I've misplaced/discarded most of my sprouting equipment and had to buy new. The Victorio 4-Tray sprouter is a nice little unit for producing alfalfa and other salad type sprouts in your house. If you are worried about the winter unavailability of fresh local greens in your diet, this sprouter can be heaven-sent.
For poultry purposes, I intend to start one tray a day (for which I will need a second sprouter, as alfalfa sprouts take 7 days) and each day one tray will become ripe. A little of the sprout-mass will be diverted for human consumption, and the rest goes to the hens.
I have also thought of sprouting some grains and/or beans in mason jars for additional feed. Problem is, I might not be able to get certified-organic grains and beans to sprout. Before 'organic' became the name of a government program, that might not have mattered, since the seeds were sprouted without chemicals or non-organic additives. But now, I wonder if some people will worry that my eggs are not organic enough. They'll still be grass-fed/green-fed, though.
As the poultry flock grows, I'll have to go larger-scale. I've seen pictures of people using plastic trays like the kind you get bedding plants in, on plastic shelving units, as an indoor sprout farm. I have a couple trays like that--- I once planned to grow wheatgrass in them. Might be something to try.
Saturday, October 6, 2012
Pullet Surprise: My New Chickens
Since I've decided to get into the egg selling business, I needed a few younger chickens since most of my layers are on the old side. I didn't have much hope of finding laying hens at the swap, though. Or any hens at all--- I've noticed a lot more roosters for sale than hens. But I went anyway.
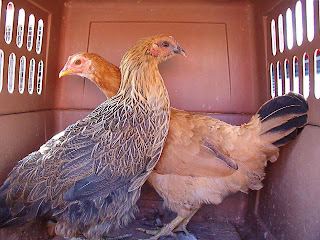 The first seller with some possibles had these two pullets (young hens) and wanted $5 each for them, which I thought was real reasonable. She then mentioned they were Araucanas--- well, Ameraucanas, anyway. I bought them both. (Ameraucanas and Araucanas are two breeds that lay blue-green eggs.)
 Another seller had some Golden Campines which were pretty but not what I wanted. Then I noticed some birds in another of that seller's cages. He said they were Welsummers--- another breed I like, which lays dark brown eggs. He quoted a price of $5 a bird but gave me a deal for taking them all. These chickens also were from this year. I got a rooster in this group which is nice so I can hatch out replacements.
 The pullets all went in the pen with the older laying hens. The Welsummer rooster, who I named Kellogg, got put in the pen with my poultry odds-and-ends. My Chocolate turkey, Imelda, took one look at Kellogg and fell in love. (She's almost invisible behind a clump of weeds.)

Kellogg was a bit nervous to have such a large female interested in him, so he distracted himself with the grain pan. The girls, meanwhile, had to cope with sharing space with my really old Old English hen. Sadly, one of the pullets was doing poorly and died, but the others are adapting well to their new home, and when I went out at ten to turn off their light, I saw that all were inside the shelter of the calf hutch.


Kellogg was a bit nervous to have such a large female interested in him, so he distracted himself with the grain pan. The girls, meanwhile, had to cope with sharing space with my really old Old English hen. Sadly, one of the pullets was doing poorly and died, but the others are adapting well to their new home, and when I went out at ten to turn off their light, I saw that all were inside the shelter of the calf hutch.
Sunday, September 23, 2012
Fun at the Fur and Feather Swap/Swap Schedule


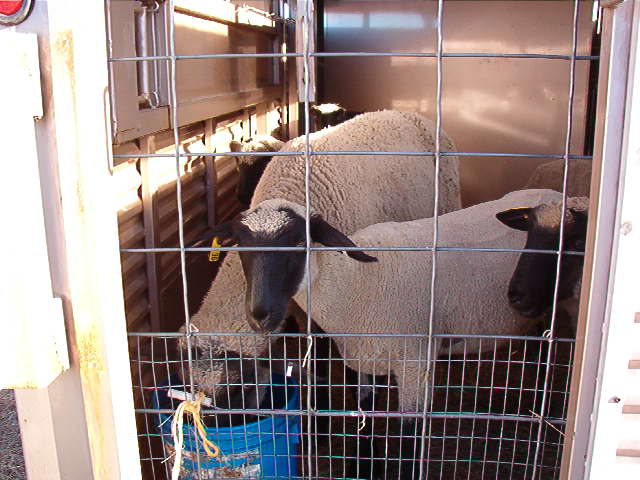
The ugly hand of government showed up in a government vet who checked on my sheep to make sure they had that evil 'mark of the beast' government tag without which you cannot buy or sell (as mentioned in the Biblical book of Revelation). I did. An aside: I saw an article about the scrapie program which said that in ten years, the scrapie tags would eliminate scrapie. That was over ten years ago. Why are scrapie tags still required???

On the kitten front, several hopeful little boys spent the day petting and playing with some of the kittens, but Parental Units said no to taking any home. I did find a new home for a very shy but beautiful Calico kitten I thought would be the hardest to place. So it wasn't a wasted day. I do wish, however, that I'd had up-to-date farm business cards, maybe even a farm brochure as I had in years past. And some more signs, and a few more things to sell. But, there are three more sales to go, I can get better as I go along.
I also got on the mailing list for the Fur and Feather swaps, and picked up a copy of the Fall Swap schedule. There are three swaps left for the year. They are:
Saturday, Sept. 29 at Tractor Supply Company, Marinette, WI
Saturday Oct. 6 at Marinette Farm and Garden, Marinette, WI
Saturday Oct. 13 at Peshtigo Feed Mill, Peshtigo, WI
All swaps are 8 am to noon, local time. It is free for buyers and sellers, you must bring your own cages, and they are held rain or shine. Swap participants are responsible for complying with any and all government regulations involved in transporting and selling animals.
The swaps are sponsored by the Northern Poultry - Pigeon and Rabbit Club.
Friday, September 14, 2012
How NOT to Ship Worms
I recently ordered some red worms from an eBay seller. This morning I got an urgent call from my local post office--- my worms had arrived, and were escaping their package!
 This is my first sight of the worm package at the post office.
 After I got home with the worm package, I saw one of the escape routes.
 Opening the box I found worms, living and dead, on the box flap.
 There were two worms on the brown paper that was wrapped around the worm bag.
 Removing the brown paper I saw many worms outside the bag and in the box. About half of these worms were dead.
Since some people have this odd belief that worms are icky, I believe it's very important for worm breeders to ship in more secure containers to prevent escapes. At the very least, there should have been much more tape on the shipping box to avoid frightening the postal employees!
Removing the brown paper I saw many worms outside the bag and in the box. About half of these worms were dead.
Since some people have this odd belief that worms are icky, I believe it's very important for worm breeders to ship in more secure containers to prevent escapes. At the very least, there should have been much more tape on the shipping box to avoid frightening the postal employees!
Note: the worm books I mentioned in the previous post tell how to ship worms. These books are:
Raising Earthworms for Profit by Earl B. Shields .
.
Profitable Earthworm Farming by Charlie Morgan


Note: the worm books I mentioned in the previous post tell how to ship worms. These books are:
Raising Earthworms for Profit by Earl B. Shields
Profitable Earthworm Farming
Wednesday, September 12, 2012
Building a Tidy Cat Worm Propagation Bin
Earthworms need homes, too. And they don't ask for much in the way of housing. This simple worm propagation bin, ideal for those who raise just a few worms for composting or fishing, is almost too easy to make.
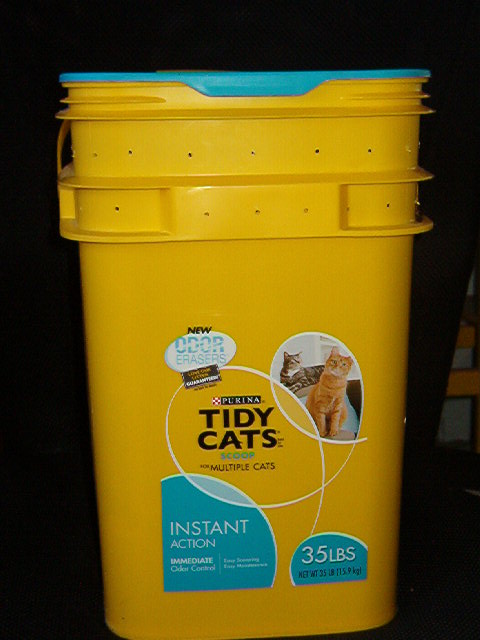
 This is a cat litter pail, bought from Walmart with 35 lbs of cat litter inside. When it was empty, it became my new worm bin. This is a nice size, but I also have a somewhat smaller bin, also made from a cat litter pail, that works as well.
 The first step is to drill in some air holes. In my first attempt at a cat litter pail worm bin, I drilled all the holes in the top. Not a good idea. You see, with the holes at the top, you can't stack the bins. So in this model, I drilled the air holes at the top of the pail, using a small drill bit.
Drain holes must also be drilled in the bottom of the bin. This is in case one gets too enthusiastic about wetting the worm bedding. Worms cannot live in over-wet bins, so drain holes are needed.
 Bedding for worms is also their food source. One type of bedding is shredded/torn paper. Paper bedding must be soaked in water for 24 hours, then as much water wrung from it as possible. Then you fluff it out.
My paper bedding includes a lot of paper my mother shredded with her paper shredder (crosscut). It also includes hand-torn newspaper torn into about 1 inch squares.
Well composted manure is also a good worm bedding. I have loads of manure, just not so much well-composted. The composted manure must be moist. In this worm bin, I alternated layers of composted manure and damp shredded/torn paper.
Peat moss is also used in worm bedding. Commercial vermiculturalists often use 50% peat moss and 50% composted manure. Like paper, peat moss must be soaked in water for 24 hours and wrung out for use in a worm bin.
Worms for the worm bin may be obtained from a local worm farm, a bait shop, or purchased in bulk on eBay. Rule of thumb is you want about 1 lb of worms for every square foot of worm bin. Using less, it will take longer for your worms to propagate to desired levels. The type of worm you want is the red worm, or red wiggler, the common type of worm used for fishing, composting, and many other purposes.
To learn more about worm care, I recommend the book Raising Earthworms for Profit by Earl B. Shields. I believe it is the most complete book on the subject.
Profitable Earthworm Farming by Charlie Morgan is also a fine worm manual, and it also includes a short chapter on raising mealworms.

Drain holes must also be drilled in the bottom of the bin. This is in case one gets too enthusiastic about wetting the worm bedding. Worms cannot live in over-wet bins, so drain holes are needed.

My paper bedding includes a lot of paper my mother shredded with her paper shredder (crosscut). It also includes hand-torn newspaper torn into about 1 inch squares.
Well composted manure is also a good worm bedding. I have loads of manure, just not so much well-composted. The composted manure must be moist. In this worm bin, I alternated layers of composted manure and damp shredded/torn paper.
Peat moss is also used in worm bedding. Commercial vermiculturalists often use 50% peat moss and 50% composted manure. Like paper, peat moss must be soaked in water for 24 hours and wrung out for use in a worm bin.
Worms for the worm bin may be obtained from a local worm farm, a bait shop, or purchased in bulk on eBay. Rule of thumb is you want about 1 lb of worms for every square foot of worm bin. Using less, it will take longer for your worms to propagate to desired levels. The type of worm you want is the red worm, or red wiggler, the common type of worm used for fishing, composting, and many other purposes.
To learn more about worm care, I recommend the book Raising Earthworms for Profit by Earl B. Shields
Profitable Earthworm Farming
Tuesday, September 4, 2012
The Great Comfrey Rescue

Comfrey plants aren't always relished by livestock at first. I've found you can encourage comfrey consumption by putting grain on top of some comfrey leaves. Once the animals get a taste of it, throwing a bunch of comfrey to your sheep and goats is like throwing a cow to hungry piranha.
My comfrey plantation did well and I had started planting some comfrey roots in a pasture section, when the comfrey plantation was wiped out by a small flock of Pilgrim geese. The plants out in the pasture did poorly due to grass competition, so later I transplanted what I could find into old tires. They were still doing poorly.
Then the other day while surfing the web, I came upon an article about things to feed one's chickens. The author says this:
"Comfrey is amazingly productive, especially if fertilized heavily (and it will take any form of fertility you throw at it, including raw chicken manure). Protein content is high (higher than alfalfa, and can if well grown be as high as soybean, dry weight basis). I cut and feed as needed, more at times in the season when the pasture is less generous. Chickens eat comfrey well. Geese love it." Read the rest of the article at the link above.So I decided today was a good day to do a comfrey rescue--- kind of like a dog rescue but with less barking. The new comfrey plot had been kindly tilled up by my assorted poultry when their pen was in that location, and all I needed to do was use the Magic Hoe to loosen up the soil and start transplanting.
Wonder Hoe? It looks like this:
 |
| Wonder Hoe--- my second favorite tool, after the crucifix in my vampire-hunting kit. |
 |
| Wonder Hoe is ready for her close-up |

Thursday, August 30, 2012
Mineral Blocks can cause Salt Poisoning in Sheep
Last Sunday I went to Tractor Supply in Marinette, WI to buy some supplies. While there, I picked up a sheep mineral block.
When I set it out, I was careful to see that the sheep had plenty of water. I knew they would overdo it on the mineral block and they'd be thirsty.
The next morning, the water supply, which I thought was more than enough, was empty, and some of the sheep were showing symptoms of salt poisoning. Though I didn't know that at first, I was too busy filling all the water troughs and making sure all the sheep got a drink.
The info on the internet was grim. Salt poisoning is 50% fatal. Or more than 50% fatal, depending on which information source you read. And there isn't much to do to treat other than give them water in small amounts throughout the day--- too much water at once can be bad.
Sure enough, I lost 2 ewes that day--- including Rilla, one of my best older Dorper cross ewes, and her purebred Shetland mother, Nadezhda. Yesterday evening, I found another ewe dead.
The good news is that my most valuable Dorper cross ewe, Sarang, recovered even though she was rather badly affected.
I've decided, as a result of this experience, that my sheep get plenty enough minerals from all the weeds they eat. They don't need mineral blocks, especially if they can cause results like this in spite of precautions.
Tuesday, August 28, 2012
Ram Lambs for Sale
We currently have the following ram lambs and wether lambs (neutered ram lambs) for sale. They are not registered, but are purebred Shetland:
Ram lambs:
#360--- a twin moorit (brown) ram lamb, $115
#470--- single black krunet (krunet means 'white mark on head') ram lamb, $100

Wether lambs:
#467---- white wether lamb, $70 SOLD!
#450--- black with small horns, $70
#452--- black with larger horns, $70
 Located in Menominee, MI. All sales cash only. Contact by phone 906-374-0130. We will also be having some unregistered female Shetland sheep for sale.
Craigslist Ad for these sheep
Ram lambs:
#360--- a twin moorit (brown) ram lamb, $115
#470--- single black krunet (krunet means 'white mark on head') ram lamb, $100

Wether lambs:
#467---- white wether lamb, $70 SOLD!
#450--- black with small horns, $70
#452--- black with larger horns, $70

Craigslist Ad for these sheep
Tuesday, April 24, 2012
Fun with Ear Tagging

Sadly, government tyranny has imposed the scrapie ear tags on us, and threatens further tyrannical control over our animals' ears. But the numbered scrapie tags do duplicate something a lot of us would be doing anyway.
I buy my ear tags from Premier One. These tags are both cheap and high quality. I now use size 5 tags for my adult animals--- easier to read from a distance, especially with my ewes who turn their heads whenever they see me looking at their tags. Lambs I tag with size one tags--- currently pink and blue to indicate sex, though I may switch to colors indicating breed.
I also put on a second tag with the animal's name written on with a tag pen. This helps when the ewe loses a tag. The name tags--- bottom ones in the picture--- also have dots on the bottom indicating single/twin birth.
The name tags do tend to fade when exposed to the sun, so the underside may be the only readable side, especially on older ewes. I've started writing information on the underside of the number tag--- name, birth number, and birth year--- 2009 and 2010 in the pictured tags. This can only be read when I catch the animal to look at the underside of the tag.
I also use tag color to identify the breed of the animal--- yellow for pure Shetlands and lime green for White Dorper crosses. This is helpful for those 1/4 White Dorper crossbreds that may look mostly like a Shetland.
A third form of identification when you have Shetlands with various markings is to take digital pictures of the whole herd every year and print out thumbnail sized pictures--- there will be 30 pictures on a sheet. I rename the picture filename to the name of the animal, and so the printout has the name of the animal under her picture. By this method if your sheep manages to lose both tags, you can identify it by comparing markings.
I do an annual inspection of each sheep in which I take the photograph and check on the ear tags. If the ear tag is damaged, or the hole in the ear has gotten too wide, retagging may be indicated. I also replace faded name tags when I can.
Because I have a lot of size 2 official scrapie tags left over, when I have a lamb who I know I will sell, I tag it with one of these tags from birth, rather than the lamb tags.
Each breeder will want to have his own system. For example, if you don't name individual animals, you might want to order tags which duplicate the scrapie tag's number for the second tag. You might use tag color to indicate birth year. If you have Boer goats and you are breeding for the four teat trait (or the two teat trait) you might come up with some way to indicate teat number and quality. Easier than upending a grumpy buck to see if he's got two or four buck teats!
Subscribe to:
Posts (Atom)